How to Make a Simple Shopping Bag

Grey striped ticking shopping bag
Sytlish Shopping Bag in Grey Striped Ticking

Whether you are just starting out and learning to sew or just love making things with fabric, making a simple bag is a fun way to spend a wet afternoon.

Unless your lifestyle is totally Zen you are bound to have something around the house that lends itself to recycling or more correctly, upcycling.  Tea towels for example are excellent, or old pillow cases, sheets or duvet covers, as long as the fabric is strong and still in good order.  Old cushion covers can also be good candidates.  We’ve used old jeans, too.

To make a tote bag 17″ deep x 15″ wide (43 x 38cm), you will need:

2 pieces of fabric 18″ x 16″ (46 x 40cm), this includes seam allowance

2 long strips of fabric for straps, 20″ (51cm) long x 3 1/2″ (9cm) wide

Sewing cotton

Grey Striped Ticking for Shopping Bag
Edge the Grey Striped Ticking pieces and pin together

Begin by edging the two pieces of fabric if it is likely to fray, either with a zigzag stitch or an overlock stitch if your machine has one.  Pin the two pieces right sides together.  Sew down the sides and across the bottom, leaving top edges open.

Side seams for Grey Striped Ticking Shopping Bag
Press seams open

Press seams open.  We’ve used Grey Striped Ticking for the front of the bag and a plain white canvas for the back.

Bottom corner edge for grey striped ticking shopping bag
Pin the seams together

In each of the corners match the side seam with the bottom seam creating a point.  Pin in place.

Stitch securely across the corner at right angles   Cut off excess fabric and seal edges.  This gives the bag a greater carrying capacity as it will accommodate larger items more easily

Top edge of grey striped ticking shopping bag
Fold in 1″, press and sew

At the top of the bag, turn 1″ to the inside, press and stitch into place, about 1/2″ from the edge

Making the straps for Grey Striped Ticking shopping bag
Fold in the rough edges and press, then fold together and pin, then sew in place

Make straps.  Fold in 1″ along the whole length of the long edge and press. Repeat this for the other side, leaving a small gap in the middle so there is no overlap when the two sides are folded together. Fold, press again, pin and sew in place.  Oversew ends or press under 1/2″ to get a clean edge.

Straps for grey striped ticking shopping bag
Adding the straps  to the Shopping Bag

Measure 4 1/2″ in from the side seam and mark either with a pin or chalk.  Place one end of the strap alongside the pin or chalk mark or as close to this measurement as possible matching stripes as shown, and pin.  Repeat for all four straps. Stitch straps to bag with either a box or multiple rows of stitching to make sure the straps are strongly secured.

Press bag to finish.

The possibilities are endless, just let your creativity flow.  Some suggestions:

  • Add you own designs to the front panel, eg embroidery, hand-painted designs, applique, patch pocket from an old pair of jeans, buttons, beads, iron on patches.  It’s easier to do this before making up the bag, so plan your design first if you can. Choose a modern stripe, or if you’re a fan of shabby chic or boho chic go for it.
  • Make the bag bigger or smaller.  You can make it long and narrow, or make the bottom corner sections bigger so the bag becomes wider.
  • The straps can be made narrower or wider, or you can use twisted cord, leather straps, or wooden hoops.
  • If you want to use up lots of small pieces of fabric you can create a patchwork panel in the desired size with a plain back, or use patchwork for both.  Straps can also be made of multiple pieces as long as they are securely stitched and not too bulky.
  • For thinner fabrics you might need to use either double thickness or stitch the lighter fabric to a lining fabric, or you could use iron on vilene to get a firmer result.

Crafting is fun, and carrying your own bag is so much nicer than carrying some brand name around on your arm.  Your bag will last much longer than a plastic bag and will be washable and eco-friendly, too.  Advertise your own creativity, you never know someone might ask you to make one for them, and they make great presents.

Boot fairs can be good places to find odd pieces of fabric or check if your local church or scout troup are planning a garage sale.  You can find patchwork packs in our eBay shop or go to www.designercushionsandthrows.co.uk where we will soon be selling organic linen, cotton and hemp if you want to become more green.

Send in your photos and we can vote for the most creative.

Vintage Footstool goes Shabby Chic

As the seasons change we see our “stuff” literally in a different light.  But before we decide to part with something, it might be worth taking a moment before sending something to landfill to consider if it could be given a new lease of life.  Even if an item no longer has pride of place in our own home, it might still be of use or value to someone else, either as a gift, or possibly in exchange for an unused object or collectable in their bottom drawer, or even to sell on.  After years of “Highstreet-ality” and seeing the same old same old in every shop in every town, interest in the original and unusual is beginning to grow once more.  It’s so refreshing to be different!

Recycling is a concept we are all now very familiar with.  Giving something a makeover is not only recycling at its best it’s also satisfying.

Shabby Chic Footstool
Vintage Footstool goes Shabby Chic

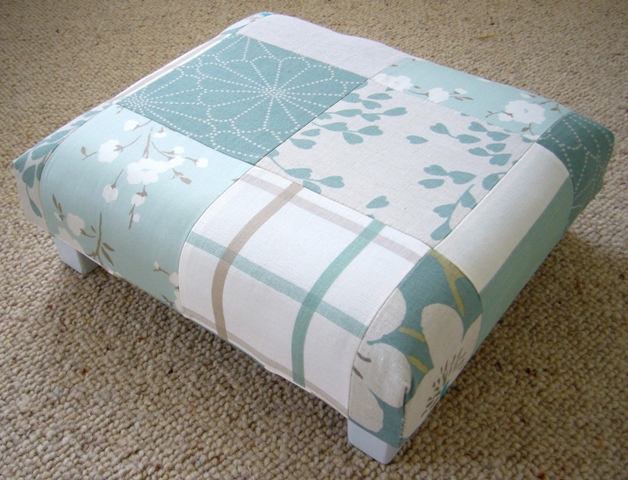
We took one old vintage footstool that was in very tired shape and gave it the works.  The legs were shortened to give it a more modern feel and then the base and legs were given a coat of paint in a soft shabby chic grey.  French Grey is a very popular colour, but you can mix your own shade using a standard water based quick dry satin in white and adding a similar quality black in the amount of your choice to achieve the desired shade, which you might wish to vary according to the item you are painting.   This gives you a lot of paint shade choices at minimal cost.  Just be sure to mix enough to complete the project in hand as having to remix a new batch might result in colour variations.

The cover is made in a patchwork of a selection of florals, checks, stripes and plain in linen and cottons in complementary shades of Duck Egg Blue, Naturals and Offwhite by designer company ROMO.  These top quality furnishing fabrics will give lasting pleasure across many seasons, not just one.  As well as being perfect for putting up your feet after a long day, the footstool can also be used as a meditation stool, or as a small side table for a tray with your favourite cuppa and biscuits as you relax in front of the fire.

Shabby Chic Sidetable

Got time and paint left over…….?

Recycling, upcycling, precycling?

Director's Chair with patchwork cover
Director's Chair revived with patchwork cover

This Director’s Chair was looking rather tired.  The fabric had faded in the sunlight but was otherwise in good condition, although the area where the screws hold the back panel in place had become stretched and weren’t holding the back section upright anymore.

I decided to give it a makeover and made patchwork from a variety of strong cotton fabrics in complementary greens and yellows in florals, checks and stripe patterns.  At the same time I reinforced the areas where the back bolts slot through into the frame to make sure they would hold securely.  The end result has not only given the chair a fresh feel but means that it will last a lot longer as stitching the patchwork on top of the original canvas has given it extra sturdiness.  I also gave the wood a coat of Danish oil as it was rough and dry and had been bleached by the sun and this will also help to protect it from the elements, although I probably won’t leave it outside in the rain as that would spoil the pretty patchwork over time.

Is this recycling or upcycling?  A bit of both maybe?  The fabrics used were recycled materials from pattern books, and the chair became enhanced and of value again as a result.  The chair itself is a good example of ‘precycling’.  This is when the materials used to make a product are chosen for their environmental footprint prior to production.  The wood from the frame could be repaired many times over and when it finally reaches the end of its life it can be used as firewood.  The oil used does not contain any chemicals that could be harmful.  The fabrics are a mix of cotton and linen and are biodegradable over time and will become compost.  The bolts could come in handy for repairing something else at a later date.

Have you got any projects you would like to tell the world about?

Patchwork detail

Patchwork detail

How to Make a Patchwork Throw

Use to cover a chair, as a picnic blanket or a child’s play mat

Close up of Patchwork in pink, yellow and green
Close up of Patchwork
Patchwork Throw on a Lloyd Loom Chair
Patchwork Throw on a wicker Lloyd Loom Chair

You will need:

  • 15 pieces of material 35 x 25cm each in complimentary colours in fabrics of equal weight and thickness.  Being eco-friendly, we used 100% curtain weight cotton fabric from an old pattern book
  • Two strips of plain fabric 135cm long and 17cm wide for the top and bottom borders
  • Two strips of plain fabric 115cm and 17 cm wide for side borders
  • 1.5m Lining fabric or plain cotton fabric (137cm or more wide) for backing
  • Sewing thread in appropriate colour/s

A 1.5cm seam was used throughout.  We recommend pressing seams open as you go for more accurate results

How to make the throw

  1. Lay out the fabric squares and decide best how to arrange them
  2. Sew together the top row of three and press seams open
  3. Continue by sewing the next three together, press, and follow with the third , fourth, and fifth rows
  4. When all the rows are sewn together, join the top row to the second row, being careful to match the seams of the squares by placing a pin into the seam at right angles to hold the two together ready for stitching.  Stich together and press seams open carefully
  5. Continue in this way until all five rows have been sewn together making a finished area of three squares by five
  6. Find the middle of a long border strip, and mark with a pin, fold or pencil dot on the wrong side of the fabric.  Do the same for the patchworked piece and match the centre points.  Pin carefully in place and sew together, leaving ends extending away from sides (approx 17cm).  Repeat for the bottom edge.
  7. Repeat the above for the side borders, trimming away any excess length once you have matched the lower part of the side strip to the sides of the top/bottom borders, which now lies between.
  8. At this point you can add a layer of wadding if you wish for a warmer, padded quilt.  Pin the wadding at regular intervals making sure that the fabric lies flat and that there are no folds catching in anywhere. Basting the wadding in place will help to reduce any movement.
  9. Lay out the completed top layer, right side up, either on a large table or on the floor, and taking exact measurements of the finished piece cut the lining fabric to size.  Place the lining fabric over the completed patchwork with right sides together matching side seams and corners.
  10. Sew around the outside edges of the throw leaving 40cm open along the bottom edge.  Turn the throw inside out and press around the edges, folding in and pressing the seam allowance at the bottom opening, and then handstitching this closed.
  11. Press the whole throw until you have a good finish to the edges and the seams are all well settled.  Top stitch around all four edges about 0.5cm in, and again on the inside of the border edge.  You can use the same colour or choose a contrasting colour as a feature.
  12. To anchor the throw in the middle section, we used a small decorative flower feature stitch in the corners of every other square.  This holds the layers together while  allowing them to be flexible at the same time.  For a more quilted effect you can sew down every seam from top to bottom, and across in a grid, but bear in mind that this requires greater accuracy in the preparation of your piece as any discrepancies in measurements will surface at this stage.  You can also use crochet cotton to “tie in” the layers at the corners of the patches.  Stitch through from the top with the thread leaving the end free, coming back up, down and up again, then double tie  and trim the ends leaving tufts, for a more rustic or shabby chic style finish.  Again you can make a feature by using a stronger colour.

From a recycling perspective, you could also use fabric from old curtains, or old shirts to make this throw, as long as the fabrics are of a comparable weight, clean and in good condition.  A variety of textures and colours can be fun.

Making eco soft-furnishings yourself with recycled materials contibutes to a more sustainable way of living and brings great pleasure both in the making and use of the finished item.  If you would like to let us know how you get on, or have ideas to share, or other examples of upcycling,  we’d love to read them in the comments box.

Happy making!

Pink Patchwork Throw folded view
Use as a picnic blanket or a baby play mat


Some later projects…

Pink Patchwork Throw
Blue Patchwork Throw
Red Patchwork Throw
Red Patchwork Throw

Make your own door draught excluder

Door Draught Excluder

Now that autumn is here and those nights are becoming chillier and the wind is often gusty, how about checking some of those draughts and saving on the heating bills by making your own door draught excluder?  It’s easier than you think.  You don’t have to have a single large piece of fabric, any scraps will do.  You can mix and match a range of colours and textures to create a lovely bright feature for your hallway.  Here’s how …….


Door Draught Excluder Fabrics

Select some fabrics.  These can be in a similar tonal range, but in different textures.  Here we have used some heavy weight upholstery fabric with an almost North African flair which was left over from making a chair seat cushion for a client, teamed with some pieces of velvet from a book of samples of discontinued fabric.  You could use a variety of different colours with a similar texture, or colours and textures which contrast.  Or why not use florals and stripes, or checks?  You may even find some interesting fabrics in charity shops – a perfect bit of “upcycling” (see our March entry)

Step one

Fabric pieces for door draught excluder
Layout pieces in possible combinations

Play with different combinations of colour and texture until you find a combination that you like.  You can create all sorts of ‘looks’ – rustic, shabby chic, modern bold stripes of colour, anything that matches your own style of decor and colour scheme.


Step 2

Sew fabric pieces for draught excluder together
Sew pieces together in chosen order

Sew all the pieces together allowing at least 1/2″ (or 1.5 cm) for seams.  If the fabric looks likely to fray it may be better to overlock the edges if  you can, but as the seams will be inside the draught excluder this is not usually necessary.


Step 3

Make up the pieces for the draught excluder to the required length
Make up to the required length

Continue to join fabric pieces together until long enough to fit the door, plus seam allowances at each end.  We made ours 34″ (cut 35″ with seams) long which is fairly standard for a front door, and 7″ wide as the door has a stormboard outside and we wanted to be sure to cover the gaps to each side.   Repeat the process to make a second strip of fabric.  Press all seams open.

Step 4

Place both fabric pieces together, right sides facing and stitch around the edges, leaving a 6″ gap to turn right sides out and to add the filling.  You don’t have to buy special wadding.  We used scraps of fabric cut into strips.  You could also use an old towel,  old pullovers or T-shirts, or old socks.  As long as they are clean!  You could even use shredded newspaper, or if you have some old cushions that have become matted you could use the fillling.  There are all sorts of eco-friendly materials you could use.  Once you have enough filling in place, fold the edges in, press and pin in place.  Close the seam either using handstitching or machine very close to the edge.  Your door draught excluder is ready to go.

The draught excluder in place
The finished draught excluder in place

Got some ideas you want to share?

How to give a vintage chair a brand new look!

Vintage Furniture Revival – same old chair, brand new look!

Same vintage chair, brand new look

Take one vintage chair, a lot of time and enthusiasm, and a small budget.  As I do not know how long I shall be living in my present rented home,  I wanted to create a look that works without spending a lot and I am also an avid fan of recycling,  Being tied to a green carpet is very restricting,  even though the walls are magnolia and the doors are a neutral putty colour.  The cottage needs some more vibrant colours to give it a warmer feel and also to personalise it and make it feel more like home for the time I shall be here.

Vintage Chair before
Before.......

It took a while to work out which colours would be right.  All my pinks from my last wood and white scheme just did not work, no matter what time of day and regardless of whether it is sunny or overcast.  I trawled through a lot of fabric sample books and ordered some samples to be able to see what they would look like in the lighting of the room itself.  I pinned different samples to the back of the chair in all sorts of weathers to get a feel for them.  It took a while, but in the end I opted for a fabric with magenta velvet flowers on a natural background so that the colour would not overpower in a small space but be bold enough to add a splash of va-va-vroum, whilst tempered with the subtle background.  The fabric is from the Villa Nova ‘Tiku’ Collection, in colours Flax and Grape. 

The arms were covered in neutral Italian linen

I already had a piece of linen to hand which made a good match, so to keep costs down I used the linen for the arms and back of the chair, with the floral cut velvet on the inside of the back and on the top of the seat cushion for dramatic effect.  I also piped the edges of the arms, the cushion pad and the top of the back in Tiku for contrast.  The legs were painted in Dusted Moss, Satinwood, from the Dulux colour mix range (left over from the previous project, the shabby chic sideboard  ), and adds a complementary touch.

Strengthening the back with an extra layer of hessian

Whilst recovering the chair I tightened the springs, improved the padding where necessary and strengthened the inside back with another layer of hessian as it had stretched with use.

The recovered chair
After.......

The end result is quite ‘bijou’ if I may say so myself.   Being petite, the chair is a perfect fit and I am hoping that even when I find my more permanent nesting place, it will be sufficiently versatile with the neutral background to fit in anywhere.  If not, maybe a throw?  Or a large cushion?

What projects have you got to share?  We’d love to hear about them.

Shabby Chic Anyone?


Moving Home comes with a great opportunity to let go of a lot of clutter and take stock of what is of real value.  Leaving behind a three bed semi with a very large garden for a small 1 bedroom cottage is the perfect platform for a spot of recycling.  Enter Necessary Furniture, a local company who for the cost of a phone call will come and take away unwanted items of furniture to a warehouse where things are stored until someone else decides to give them a new home, in return for a very modest fee!  Other small items of furniture found shelter among family and friends.  Some slightly more weary pieces found their way into the Council wood recyling facility.

Those bits that made it on to the van and off the other end got a shock…….  Where are the white walls and stripped wooden floors we went so well with?  A green carpet?  Suddenly all the stripped furniture looks totally out of synch and dated, even scruffy.  Being in rented accommodation and for an indefinite time means having to live with it for now. And there’s still plenty of life left in this solid vintage furniture.   As the days go by,  with smaller windows letting in lower levels of light,  a flash of inspiration pierces the gloom and “Eureka – I reach for the paintbrush!”    Shabby Chic saves the day!  It started with the chest of drawers in the bedroom, and spread to the desk and then to the sideboard in the living room, and on to the shelf in the hall.  Where will it all end?  Where else can you get so much fun from £14.99?  And the pot’s not empty yet !  It took a bit of hunting to get the right shade of grey, but there was a soft light shade in the Dulux mix-your-own range.  Not so stark as white, but still light enough to merge with the green carpet and go with the magnolia walls!  I’m sure I’ll find other things to shabby chic to the end of the pot.

Sideboard in Dusted Moss

Not sure what to do about the curtains yet, but I’m sure I’ll come up with something…….

While on the subject of recycling, a fab site called Tactile Interiors has lots of wonderful things made from ethical, sustainable and recyled materials.  Check out the lovely lampshade and table lamp made from re-cycled plastic bottles at www.tactile-interiors.co.uk

What is ‘upcycling’?

Upcycling,  to quote the wikipedia definition, is the “process of converting waste materials or useless products into new materials or products of  better quality or a higher environmental value”.  Or in the words of William McDonough and Michael Braungart, authors of ‘Cradle to Cradle: Remaking the Way we Make Things”, it is the ‘practice of taking something that is disposable and transforming it into something of greater use and value.

So, you may be wondering, how is this any different from recycling?

Well, recycling tends to involve converting or extracting useful materials from a products, often  breaking down or destroying the product to produce another item or material in its place, for example an aluminium can is melted down to make other cans.  With upcycling on the other hand more value is placed on the old product, with something new being made out of it and ideally with little or no energy being used to create another item.  An example of this would be making a table out of an old piano, which my father did after the Second World War I found out recently!  Or using an old shirt or pullover to make a child’s skirt, or a rag rug or patchwork throw, or a pair of old jeans to make a bag.  In both these instances the amount of energy used is minimal and mainly of human form, with a few tools to help along the way.

Bag made from a pair of old jeans

Reusing materials already available can help to keep energy usage lower, as it reduces the consumption of new raw materials when creating new products,  although there may actually be cases where there is less benefit to the environment in upcycling if energy used to upcycle is more than recycling back to the same product, for example glass bottles which are crushed and refashioned into kitchen work tops.

I cut up old T-shirts to make cleaning cloths and for polishing shoes, save old grubby towels to use as ground sheets when painting and decorating, and I just love making and repairing things.  What do you do with your old bits and bobs?